This time of year, better known as the "spring market" to Northampton Area realtors, we find ourselves showing a lot of houses to potential buyers. With all of the rain we've been having, the dryness (or dampness) of a basement is at the forefront of the minds of home buyers. There are many factors that can add to or take away from the potential livability of a basement space. Inheriting moisture problems from a previous owner is something one hopes to avoid when purchasing a home.
A few years ago, friends of mine purchased a ranch in Florence. It was in solid shape, with a damp basement. They intended to ultimately turn the basement into living space. The advice they received from their contractor was to demo the space and live with it for a year to see if/where/when/how water was getting into the basement. This was great advice! They eventually found an area where water was seeping in - not from below ground, but from the outside. They put in a perimeter drain, and diverted the downspouts from the gutters away from the house. Presto! No more water in the basement. Now they have begun the project of finishing their basement properly.
The article below, from the RAPV newsletter, gives good advice about how to properly finish a basement.
How to Finish Your Basement Right!
Like most things, planning a basement renovation is easier when you have all the right tools at your disposal. Read on to learn about a few tips and tricks you can use to make your project as quick and inexpensive as possible.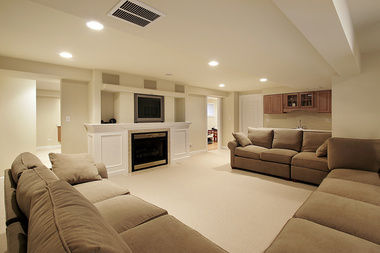
Tip #1: Find a good contractor.
Finding an experienced contractor can help make the renovation proceed as smoothly as possible. The contractor will be able to help you acquire all the necessary building permits that might be required by your city. This person's business network and connections can also be a huge asset when you are arranging subcontractors to help you with specific parts of the basement renovation.
Tip #2: Choose the right materials.
You will have to order or purchase the building materials for each phase of your basement upgrade, and it is important to make sure you choose the best materials for the job in every scenario. A good contractor will be able to help you make the right decisions about each of your building materials.
Tip #3: Increase airflow.
The basement tends to be the coldest room in the house. Many homes have the furnace at one end of the basement, making the opposite end chilly by comparison. Consider installing ducts with an in-line fan in order to even out your basement's temperature.
Tip #4: Check for signs of possible water damage.
Before you proceed with the renovation, check the foundation for cracks and check the basement floor for any pools or drips. Repairing any potential problems before you begin to renovate can save a lot of time and money down the road. If you live in a particularly damp climate, you might want to consider adding a vapor barrier before sealing off your walls and floors. Another way to reduce moisture in your basement is to offset the interior walls from the home's exterior walls. This can be done using thin strips of wood or metal, and can also be used to balance out an uneven exterior wall.
Tip #5: Add additional insulation.
Most basements are not as well insulated as the home's other levels, so if you are planning to start spending more time in the basement, it might be a good idea to add some extra insulation to your basement's walls.
Tip #6: Sand down your ceiling joists.
Many older homes have ceiling joists that are beginning to sag, and this can cause problems if you are installing a new ceiling in your basement. Sanding or planing these joists can help make your ceiling appear as smooth as possible. You can easily do this yourself by using a level and an electric sander.
These basic steps can help give your newly finished basement a solid foundation to grow from and become an integral part of your family's life.